
This is chapter three of Sam’s tech diary – make sure you read chapter one and two!
Being on lockdown means a couple of things. First of all, it gives me more time to mess about with the Raspberry Pi. Secondly, it means my wife and I (who both hate ads) are on one network all the time.
Put them together and you get a perfect opportunity to try and use Pi-hole to set up an effective ad blocker.
I’ve used ad-blocking plugins on desktop since forever. Whenever I’m setting up a new computer, adding uBlock Origin is one of the first things I’ll do. But we’ve got other devices that don’t have that capability, and Pi-hole is more flexible – not only does it work on all devices on the network, but it also blocks tracking and anything else that might annoy me, too.
It’s a particularly effective ad blocker as it works at the network or ‘DNS’ level (more on that below) rather than in your browser – rooting out internet ads at source and throwing them in its own little internet black hole (hence the name).
Done right, those in-app adverts for the latest crap freemium game should just disappear, which will be real nice. Goodbye forever homescapes!
So, how does it work?
When you hit enter in a browser, you kick off a series of events that eventually connects you to a server and requests a file.
The first of these is for your browser to make a DNS (‘Domain Name System’) enquiry. This essentially involves mapping whatever’s in your browser’s address bar to an IP address – which is how the internet references the particular server that you’re trying to get data from.
With the IP address to hand, your browser can now head off to said server, get the web content it needs and serve it back to you. You get the page you typed in, along with that recipe for banana bread you wanted – hooray!
Now, when the page loads, other requests will most likely be made, too. For example, your browser might get halfway through loading the page and spot a section that’s meant to be a picture – or, in our case, a dreaded advert.
At this point, a request is made to the ad company’s servers – generally with some information that allows them to personalise it for you, so you can find out about all those hot insurance brokers in your area that you were supposedly subconsciously looking for.
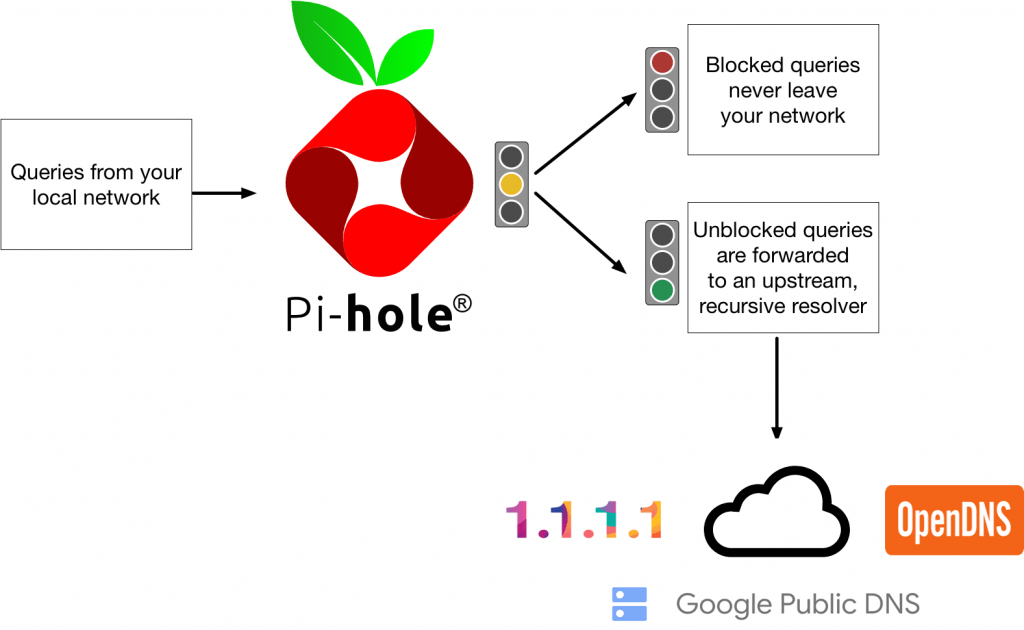
Pi-hole works by being the first DNS that you meet on your journey to getting the IP address of the webpage you want to load.
Lots of very dedicated people have built long lists of ad servers – and so if your browser makes a request to one of them, Pi-hole essentially just chucks that request in the bin. But if the request is for something that you actually want, then it passes that request on to another DNS server to get the IP address. A simple and effective solution.
Setting it up
Installation and setup seemed to work really smoothly – this useful article has everything you need.
So, once complete, I gave it a quick test by turning off uBlock Origin and opening this adblocker testing page… only for nothing to happen. Hmm.
The first few tries were kind of funny – as if the ads were valiantly fighting back. But after 20 or so minutes it was getting old and I was a bit miffed. I’d updated the DNS settings for my laptop… unplugged the network cable… soft rebooted the router… even gone and flipped the physical switch on the router to turn it off – but nothing was happening!
So I reinstalled Pi-hole, looking for a setting I’d missed during setup. But it turns out the key thing missing from almost all of the resources was that I might need to reboot the bloody laptop for this to work. Guess it’s a cliché for a reason – should’ve have paid more attention to The IT Crowd… 😔

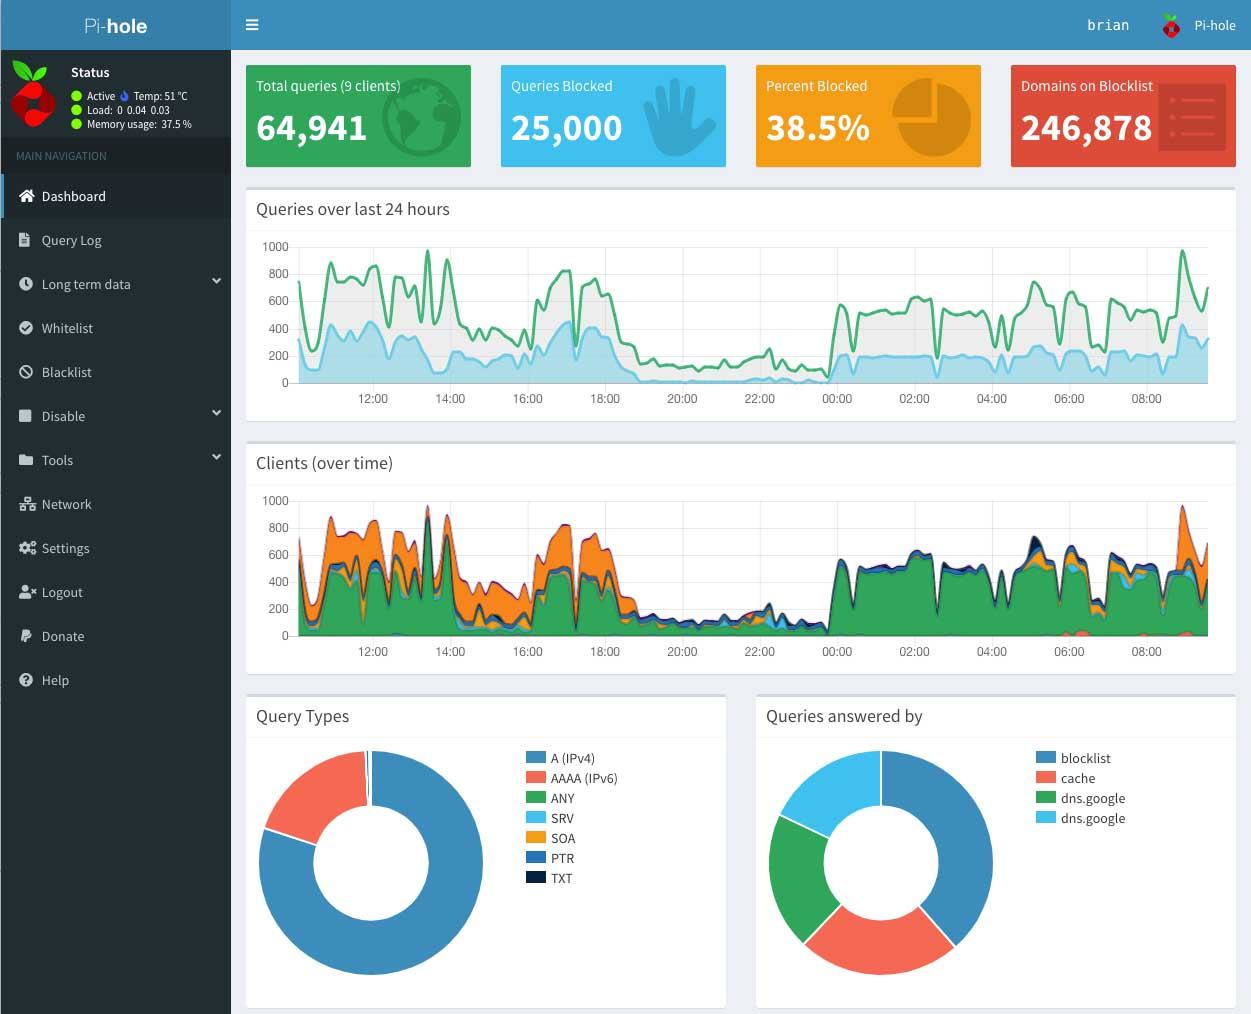
Anyway, now it’s working – and, if you choose to install the dashboard (which I’d definitely recommend), you can even see the number of ads that it’s blocked, too. Pretty satisfying.
What about other devices?
At this point my laptop was now blocking things – awesome! – but nothing else was, so I had a look at the settings in the router. Turns out that Virgin Media don’t allow you to change the DNS settings. With that in mind I had a few options:
-
Change the DNS settings on all our devices
-
Get another router and put the Virgin Media UltraMegaHub (or whatever it’s called) into modem-only mode
-
Set Pi-hole up as the DHCP server. I spoke a bit about this in my last blog – in this case this would be handy as DNS settings are often given out as part of the process that gives a device its internal IP address
The third one seemed most promising. After all, not all devices allow you to change the DNS settings (plus I’d rather not have to touch my wife’s Windows laptop), and nice routers are a bit pricey.
So I logged into the ISP-provided router and turned off the DHCP settings – then jumped over to the Pi-hole’s admin page, turned DHCP on, changed the IP address range so it looked pretty similar to the ones being issued before and voilà (in theory).
Testing this was really easy – just a case of turning the WiFi off and back on again on my phone, loading up the ad testing page again in Chrome and seeing what happens. Pi-hole lets you pause it for a little while – and as soon as I did that I was shown ads for dumb stuff I don’t want.
Welcome to an ad free future!
Several themed blocklists come out of the box with Pi-hole – ads, tracking, that sort of thing. You can choose whichever you want and add any other blocklists you find on the internet, with an option to update these in the dashboard.
I’m not reading lists of adTech domains with my long weekend so I’m going to add a couple of lists based on how popular they are on github and make sure I haven’t broken my TV.
And that’s that – no more ads!